|
| |
Metop Manager
User comments
- Thanks for a great program ... worth every penny! -
John Say
- Your software has opened many new windows on the world for
me - Peter Green
- Aw, that is SO cool! - Andrew Hall's 11 year old son
talking about the GAC auto-scroll feature.
Download the Metop Manager
Register the Metop Manager
What is Metop?
Metop-A is the first in a series of three polar-orbiting
satellites carrying a high resolution imager (the AVHRR like those on NOAA-15,
16, 17 and 18) providing "morning" weather satellite coverage of
locations all over the world. Uniquely, Metop can download all its
data from a single pass when it is in within radio reach of the polar ground
station (at
Svalbard), and this world-wide continuous data stream is broadcast over
EUMETCast to users throughout Europe. Unlike other high-resolution
satellites, you do not need a tracking antenna to get data from Metop,
nor are you restricted to data from your local region. These
characteristics make for challenges handling Metop data, but for great rewards
exploring the world as well!
Alan Sewards' quick-start guide to
configuring your system for Metop data.
G�rard Kruger's French-language
guide  to using
the Metop Manager (PDF format). to using
the Metop Manager (PDF format).
A sample of today's live images
from the Metop Manager.
Functions
Manage Metop global AVHRR files broadcast over EUMETCast.
Program capabilities:
- move the data chunks from the TelliCast received directory to their final
directory
- optional selection of "daylight-only" chunks for
processing
- convert the data chunks from EPS to a standard HRPT format
- allows you to use standard software for further processing
- for example - my HRPT Reader
program
- provides a lossless compressed HPT format for even more disk
space saving
- provide a thumbnail JPEG file for each chunk for later
quick reference
- organise the data by days in a standard \year\month\day\
directory hierarchy
- manage the chunks to limit the disk space occupied by older data
- you can easily use up 13GB per day!
- keep a database of received chunks
- provide a world-view graphical display of the location of the received
chunks
- choice of Plate-Carre�, Mercator or polar projections
- provide an attractive quick-look false-colour display of
the latest received chunk, in addition to each individual channel
- add country boundary overlay to received data
- choice of zoom level for image display
- this is your rolling Window on the World!
- can read individual EPS-format chunks of AVHRR data
- includes a Browser view of a whole day's passes on a world map
- choice of displaying ascending, descending passes or both
- select chunks to be combined with a simple mouse stroke
- combine HRPT files from multiple parts of one orbit to a single "pass"
- automatically display the "pass" in the HRPT Reader software
The Metop Manager in action
The program is intended to operate continuously, processing
each data chunk as it is received. When not doing continuous processing,
the program can also accept individual EPS chunks to analyse and display.
There are a number of tabs across the top of the screen allowing different views
of the progress. The Setup simply requires you to point the program to the
directory where your EPS AVHRR data is being received, the directory where you
would like the final data to reside, the number of days of data you want to
keep, and the format in which the received data should be saved.
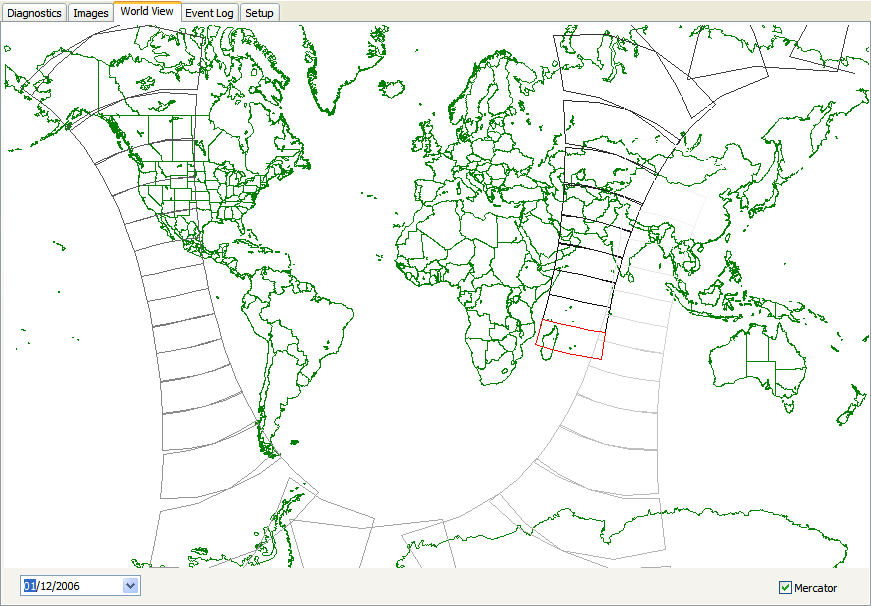
Pass View
One view in the Metop Manager shows a list of the 3-minute
chunks in which global Metop data is sent over EUMETCast. The most recent
chunk is shown in red, and older chunks are successively greyed out. You
can see the most recent chunk here is from off the east coast of Africa,
covering the large island of Madagascar and the two smaller islands of R�union
and Mauritius.
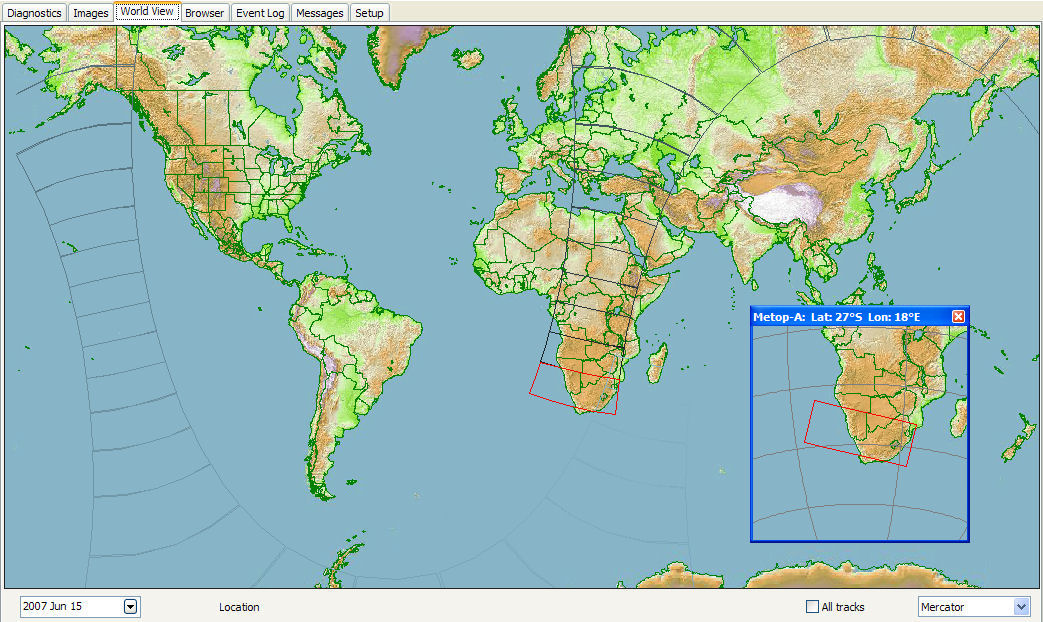
Alternatively, you can view with a more realistic
map-style background as shown below. You can also display a separate,
small Location window, providing an orthographic view of the region
around the last received chunk. This view can be displayed as a
semi-transparent overlay on the Image view as well, and provides a very helpful
guide to the question: "Where on earth is that?" when viewing various
parts of the world!
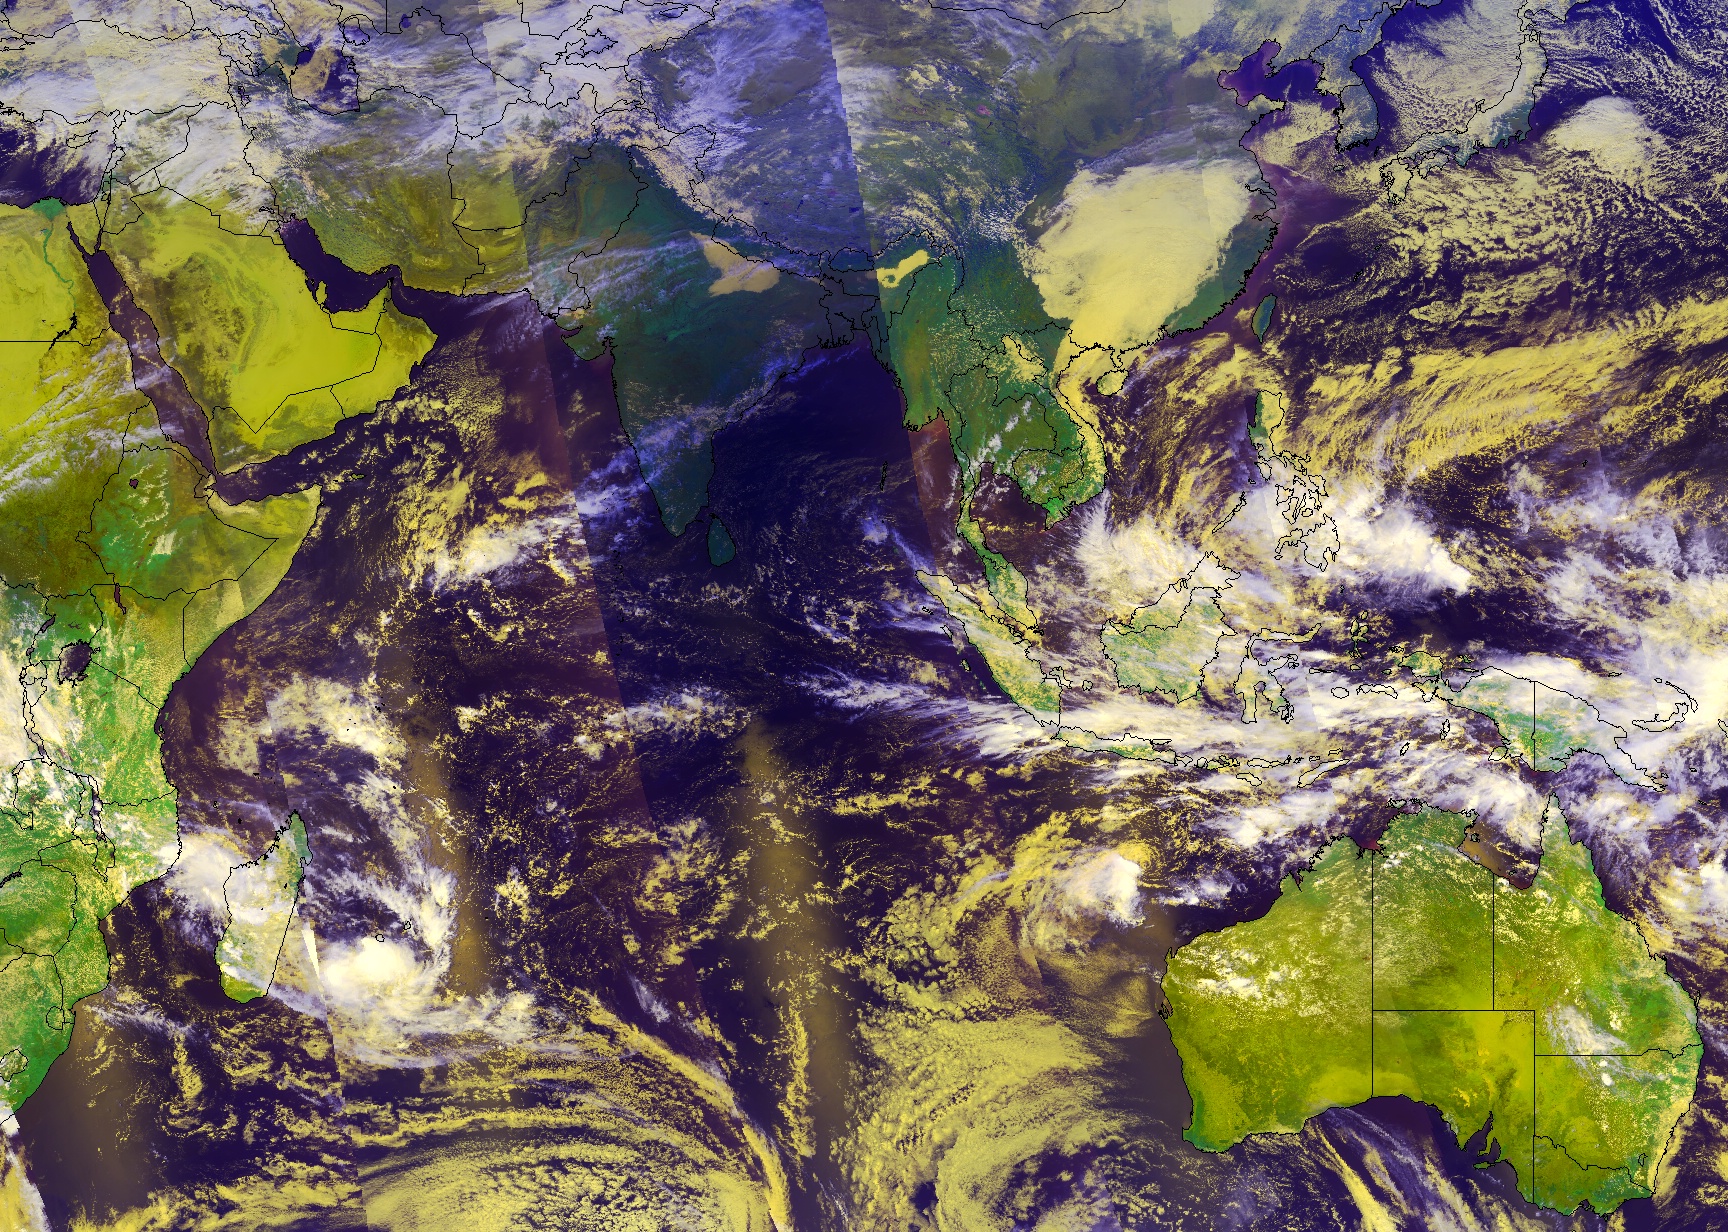
Images view
The images from the five sensor channels can be viewed for
each chunk, and the data values under the mouse cursor displayed. The pass
direction is also displayed. A simple but very attractive false-colour
combination of data from channels 1, 2 and 4 can also be displayed as a visible
indication of pass progress. This ever-changing picture also provides a
fascinating "Where in the world is that?" intellectual
stimulation for you during the day! In this screenshot, I have selected
the false-colour quick-look tab, displaying the two small island of R�union and
Mauritius from the chunk shown above. Note the green colouring for the
land, and the different colours of the clouds showing the different cloud
temperatures (i.e. the different cloud height). The resolution is
approximately 1km per pixel.
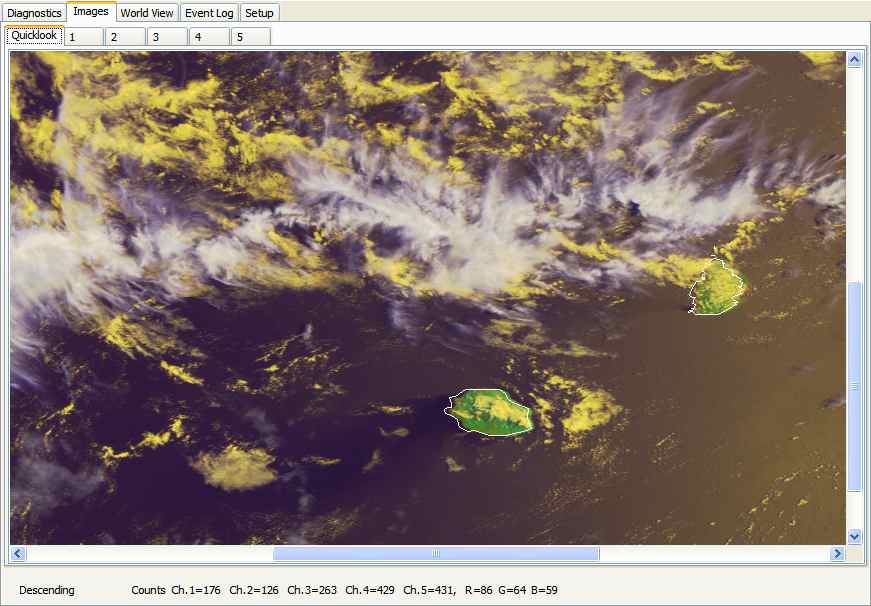
Data copyright EUMETSAT 2006
Another chunk, this time from Europe, showing southern Italy and Sicily almost
cloud-free in December sunshine. Note the could over Mt. Etna, and perhaps
a shadow of the cloud to the north-west.

Data copyright EUMETSAT 2006
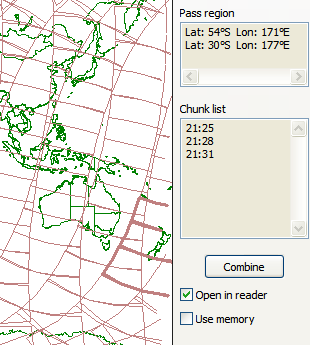
Browser view
| In the Browser, you can see all the chunks received for a
particular day, laid out on a world map, and you can combine chunks to view them
in, for example, the HRPT Reader. The make the
display less cluttered, you can choose to have either the descending (daylight)
or ascending (night-time) passes displayed separately. As you move the
mouse, the cursor location and the time of the nearest chunk is displayed at the
bottom right. To select a set of chunks for combining and display, simply
select the region with the mouse in the normal way. To do this, define a
rectangle by moving the mouse to the corner of the region, pressing and holding
down the left mouse button, drag the mouse to the opposite corner of your
selection, and releasing the mouse button. The centre of the rectangle
defines the mid-chunk of the combined pass, and the northern and southern limits
of the rectangle define the pass extent. Far easier to do than
describe! Once the selection is made (as shown below), you can click the
Combine button to assemble the composite data. If you have the "Open
in reader" box checked, your multi-chunk pass will open automatically in
the HRPT Reader (if this is installed on your system). |
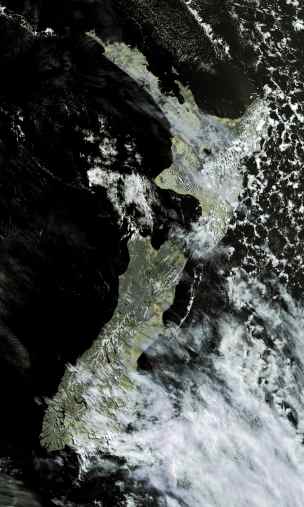
Here we have the passes from 2006 Dec 09,
where Metop-A covered New Zealand with a daylight pass around 21:00
UTC. Using the graphical selection, three chunks have been selected
ready for combining.
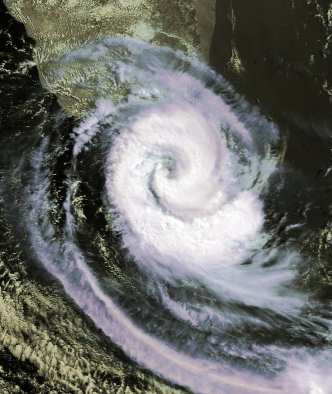
One the Combine button was pressed, data from the three selected chunks
was assembled into a composite file, and automatically opened in the HRPT
Reader, as shown to the right. |
(Click for a full-resolution version)
Data copyright � 2006 EUMETSAT & NOAA |
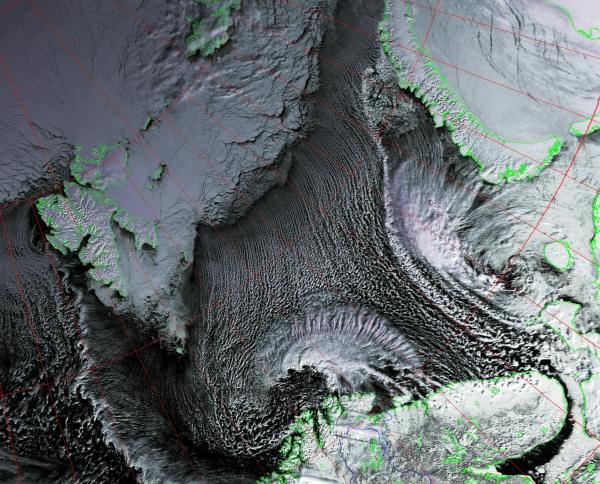
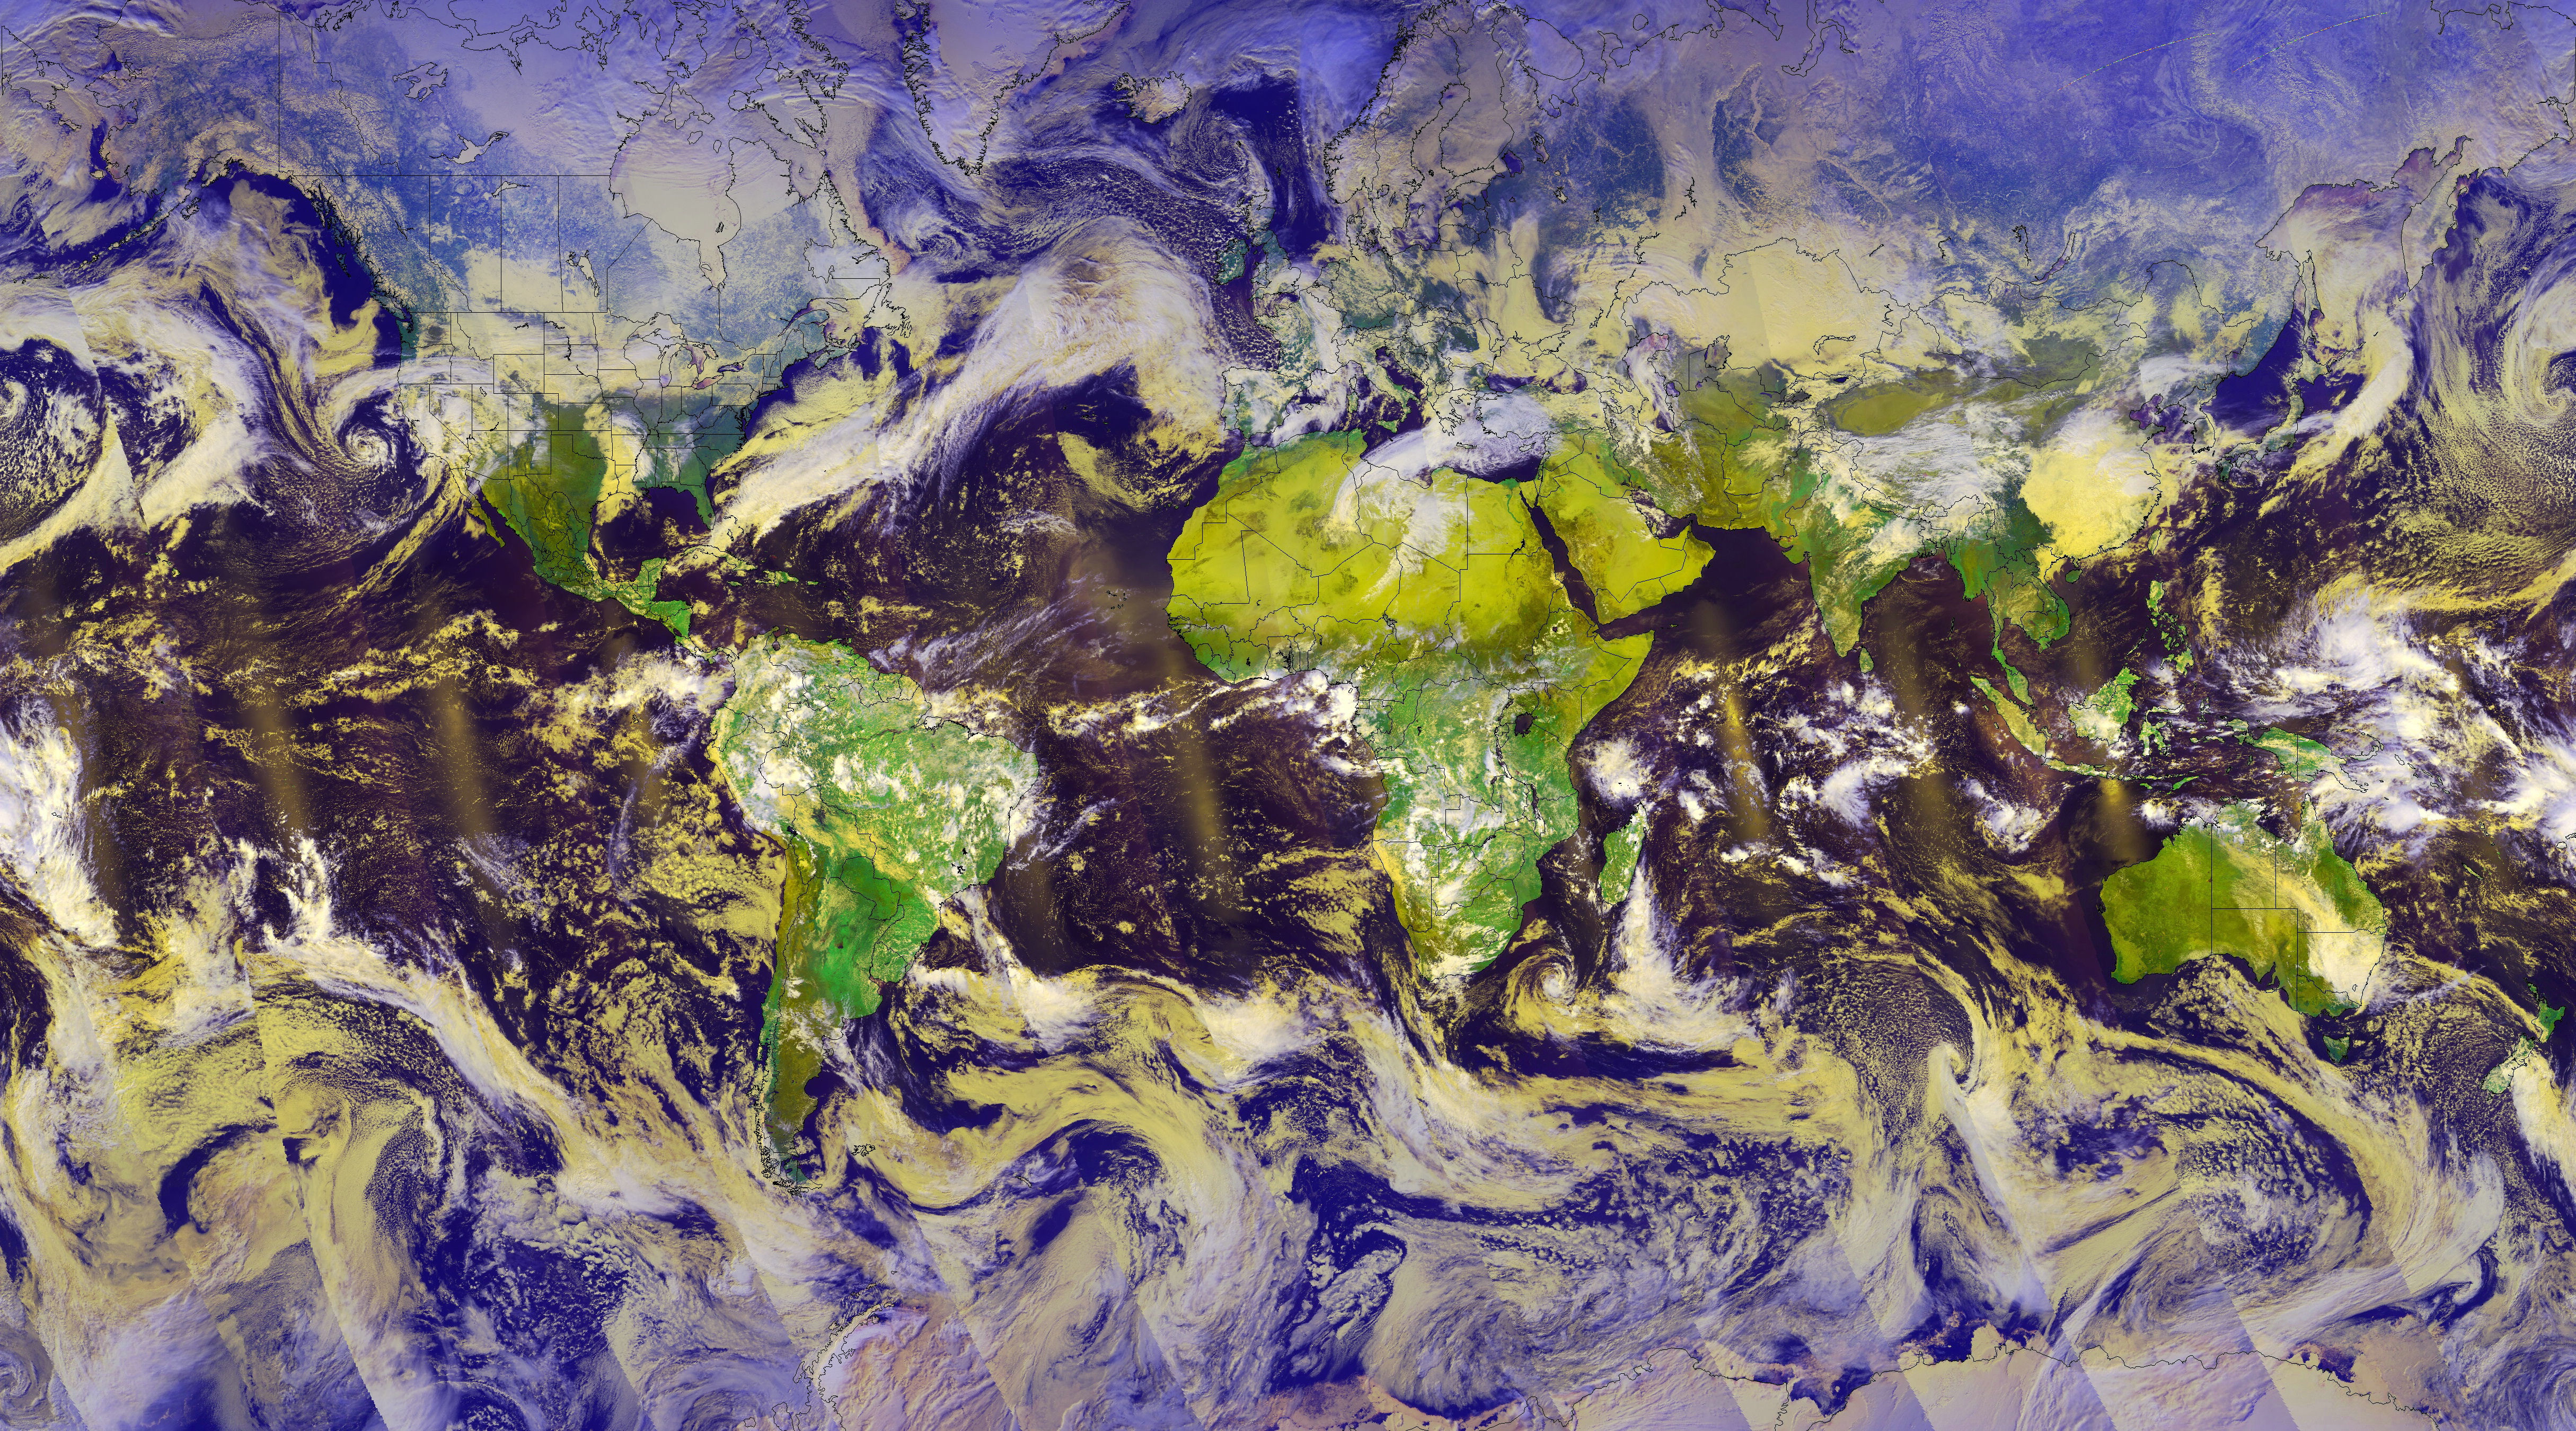
A continuously updated, world-wide view from the NOAA-19
AVHRR/GAC data now sent as part of the EUMETCast EPS data stream. Another
full 8 MB sample is here.
Please note that due to orbit changes, this will be in greyscale as there is no
longer enough daylight in the new orbit to produce these false-colour
images. This is currently in beta.
Here's a rather special image - from the Solar
Eclipse in India 2010 January 15
Requirements
- The program works on EPS data as delivered by
EUMETSAT. You will need to register with EUMETSAT to get this
data. There is guidance
on registering here.
- Metop-A AVHRR full-resolution and NOAA-18 GAC resolution
image files are currently supported.
- A screen resolution of at least 1024 x 768 pixels may be
required to operate this software.
- Processor - Pentium III 1GHz or faster.
- The program requires about 100MB of memory for its own
operation, 150MB if GAC data taken.
- Windows-7 or later is recommended. Other versions may
work but are no longer supported.
- EPS AVHRR data will consume from 7GB to 14GB per day,
depending on the format you in which you save the data. Size your hard
disk and the number of days you select to save accordingly.
| V3.0.2 |
Add last log time to application title,
optimise screen-shot saving, only save changes, optimise log-file saving,
avoid "not responding" message after start-up.
|
| V3.0.4 |
Add support for Metop-C, accept -LOG
parameter - starts with Event Log tab, handle GAC failures more elegantly,
accept GSHHG V2.3.7 shoreline & boundary data, try to handle
"Another copy..." better across restarts.
If you don't already have a Metop Manager 3 key,
contact me to purchase a licence update key before using this software.
|
Beta version: This program is under continual
development - check here
for the latest update.
Recommended settings
The Metop Manager comes with sensible default settings, but in
case you may have changed things, here are my suggestions:
- World View tab
- All tracks: unchecked
- Projection box: Mercator
- Browser tab
- Ascending: unchecked
- Descending: checked
- Open in reader: checked
- Use memory: checked (if you have at least 100MB memory
free)
- Show times: unchecked (for a less cluttered display)
- Setup tab
- File controls
- TelliCast received files: (example) C:\TelliCast\received-AVHRR\
- Processed files: (example)
C:\MSG-1\images\EPS-global\
- Save data in EPS format: unchecked
- Save data in HPT format: checked
- Save HPT in compact format: checked
- Save thumbnail: checked
- Data retention days: 2
- Combined files path: (example) C:\MSG-1\images\EPS-combined\
- Segment Selection
- Process night-time passes: enabled
- Annotation
- Boundary style: Quick Look: black, Ch.1..3: grey,
Ch.4 & 5: dark
- Boundary data: (example) C:\WXtrack\countries.dat
Lire
ces informations en fran�ais -
MS Word,
Adobe PDF. Mes
remerciements � G�rard Kruger.
In September 2012 ESA launched a second Metop satellite for
EUMETSAT. Support for this satellite - named Metop-B - is being added to a
new upgrade of the Metop Manager as the data comes online and is released to the
users. At the time of writing Metop-B GRAS data is supported in release
2.0.2 of the Metop Manager, and support for other data will be added as
that data is released. The existing Metop Manager version 1 will not
support Metop-B or Metop-C (due for launch in 2016), and existing users can buy
a reduced price upgrade for their
present Metop Manager to enable it to handle the new data running in a parallel
running instance. Without an upgrade licence, the new Metop-B function will not
be enabled. Remember to get your PC's hardware
fingerprint when buying an upgrade licence. If you bought the Metop
Manager after 2012- November-01 it will already include Metop-B capability.
How to upgrade: When upgrading, first download
and install the new Metop Manager 2. It should continue to work just as
the Metop Manager 1 with your existing licence key, but without the new
functions. Only then should you order the upgrade, checking the new
hardware fingerprint for the order form. The upgrade supports Metop-C as
well.
Other tasks: You should update to the current HRPT
Reader program (V2.10.10 or later), and consider how you will obtain regular
Kepler updates. I recommend adding the Metop-B NORAD number to my Kepler
Manager software, and adding "38771=Metop-B.txt" to the
KeplerManager.ini file. You can download starter historic Kepler data here.
Parallel running for Metop-B and Metop-C
To support both Metop-A and Metop-B/C requires that you run two
copies of the program on a single PC - your licence key permits this. You
may already be familiar with parallel running if your run two copies of the MSG
Data Manager to receive both full-scan and rapid-scan data as described here.
You need to create a new directory for your Metop-B copy of the Metop Manager,
and yet another for Metop-C:
md C:\Tools\SatSignal\MetopManager-B\
and then copy (not
move!) all the files from your present working instance to the new directory,
renaming them to -B. You could make a batch file to do this so that you
only need to update one instance when a new version is released:
copy MetopManager.exe C:\Tools\SatSignal\MetopManager-B\MetopManager-B.exe
copy MetopManager.*.lng C:\Tools\SatSignal\MetopManager-B\MetopManager-B.*.lng
copy RestartMetopManager.cmd  C:\Tools\SatSignal\MetopManager-B\
copy UserMap.jpg C:\Tools\SatSignal\MetopManager-B\
pause
Do remember to rename the files
to -B (e.g. MetopManager-B.exe), otherwise the settings between the two
instances will become mixed and both you and the software will become very confused! Remember
to edit
the file RestartMetopManager.cmd to point to MetopManager-B.exe if you use
automated restart. After copying and renaming the files, you should have a
set:
MetopManager-B.exe
MetopManager-B.DEU.lng
MetopManager-B.ESN.lng
MetopManager-B.FRA.lng
MetopManager-B.ITA.lng
MetopManager-B.ntv.lng
RestartMetopManager.cmd
UserMap.jpg
Note that the automated restart command file and the
background image do not get renamed! There is no need to enter your
licence key into the second instance - it shares the licence with the first. To set up the programs for
Metop-A and Metop-B: Close both programs, run the new instance, and using
Help, Register, enter the new Metop Manager 2 key you have received. You can then
restart both copies, and the Help, About should show the string [Metop A & B] after your name as proof of a full-function licence.
On the setup tab, you should see a choice of satellite so choose one for Metop-A
and the other for Metop-B. You will want to uncheck "Delete other" on both
programs for parallel running. Do not blindly
copy the source directory locations from the first instance to the second, but
you can copy the destination directories as the program will create new
sub-directories for the Metop-B data. Leave
the source directory locations at their default settings, and build up the new
directory locations one at a time until you have the set you need. Leave
the unset ones as "-enter-path-" which is supposed to be a directory
which will not exist on your system. You can use the same
"Processed global Metop files path" and "Processed global NOAA
files path" the same as on the first instance, as (a) the Metop-B data will
be written to different directory names and (b) only one instance of the program
should be enabled as the NOAA data handler (see below). Both programs should have Delete Other unchecked.
We need to build up Metop-B support gradually as the new data is released to
users, so at the moment only point the second program (Metop-B) at the GRAS
data from EPS-6. Leave the other data directories pointing at nothing
valid, as they should be by default. Parallel running -
NOAA GAC data
The program which will handle NOAA GAC data will be the one where the directory for GAC data points at
the received EPS-15 data, so only set that on one program. By default, the second instance should automatically have invalid paths
set for all data sources. As Metop-A data will cease at some point in the
future, it is recommended that you move reception of NOAA data from your Metop-A to your
Metop-B instance by stopping processing on the Metop-A and Metop-B instances,
and transferring the directory names and other settings between the two
programs. Then point the Metop-A directories at some invalid directory
name, or at least one which does not contain EUMETCast data. Information in this section is
being expanded as experience with parallel running is gained.
- Join the Metop
self-help group
for the latest information.
- There is a WebCast from the COMET Program: "An
Introduction to the EUMETSAT Polar System". The WebCast is available at
http://www.meted.ucar.edu/EUMETSAT/eps/
and takes approximately
one hour to complete. (Thanks to Peter Green for pointing this out.
Registration (free) may be required.)
- You will need to register with EUMETSAT to have Metop
reception enabled. There is a guide
to completing the online form, kindly prepared by members of GEO - the Group
for Earth Observation.
- On the online EUMETSAT form, to be sure to check "Global
Data Service, METOP AVHRR" in the Polar Data Service section.
- Be sure that your TelliCast client software is V2.4.4 B (or
later if recommended by EUMETSAT). Surprisingly, 2.4.4a is a
later version!
- There is a lot of data! Each 3-minute raw file occupies
28123KB, so that's about 550MB every hour, or 13GB
every day.
- I recommend, as do EUMETSAT, a two-PC configuration with
one PC devoted to reception. Should you want to add a Metop PC to your
existing system, you can use a standard satellite-TV RF
splitter to feed two PCs from one dish and LNB. You can also get
dual-output LNBs should you wish.
- You need to enable PID 510 (decimal) on your SkyStar
software. Use Setup4PC
 as described
here. Arne van Belle writes: For enabling
PIDs you have to right-click on the green satellite icon
and run Setup4PC. Choose Data services and uncheck "Hexadecimal".
Now type in '510' in the field left of Insert and click this Insert button.
as described
here. Arne van Belle writes: For enabling
PIDs you have to right-click on the green satellite icon
and run Setup4PC. Choose Data services and uncheck "Hexadecimal".
Now type in '510' in the field left of Insert and click this Insert button.
- You must set your recv-channels.ini to split the
data streams by removing the wildcard [*] entry, and replacing it with a
section for each data stream you wish to receive.
- You need to add the data channels named EPS-10
and EPS-15 to your recv-channels.ini
file. For example, if your entry in that file for the HRIT data from
Meteosat-9 is:
_________________ recv-channels.ini _________________
[EUMETSAT Data Channel 2]
target_directory=received
Add entries like this for the main image data - Metop AVHRR on EPS-10 and
NOAA-19 GAC on EPS-15:
# Metop AVHRR
[EPS-10]
target_directory=received\EPS-10
# NOAA-19 GAC
[EPS-15]
target_directory=received\EPS-15
You may also want to receive the service and test messages which
EUMETSAT send out from time to time, as the Metop Manager can process and
display these messages. To do this, you need to add an entry for the
data channel EPS-18 like this, and point the Metop Manager "TelliCast
EPS Service & Test received files path" to the appropriate new
directory.
[EPS-18]
target_directory=received\EPS-18
If you also need to receive other EPS data, put it in separate
directories as far as possible. Only add entries for data you
specifically want - it is vital to minimise the data flow to avoid missing
segments. For
example:
# AMSUA-A
[EPS-2]
target_directory=received\EPS-2
# ASCAT
[EPS-3]
target_directory=received\EPS-3
# ATVOS
[EPS-4]
target_directory=received\EPS-4
# GOME
[EPS-5]
target_directory=received\EPS-5
# GRAS
[EPS-6]
target_directory=received\EPS-6
# HIRS
[EPS-7]
target_directory=received\EPS-7
# MHS
[EPS-8]
target_directory=received\EPS-8
# IASI
[EPS-11]
target_directory=received\EPS-11
I recommend using a separate directory for receiving Metop AVHRR data so as
to limit the number of files in a directory. I strongly recommend that
you do not use the wildcard entry [*] as a way of directing all data to a
single "received" directory. Using [*] looses you a lot of
control over what data you receive, and may flood your PC with unwanted data
from Metop! Removing the [*] entry may be a major change to your recv-channels.ini
file, but it's worth it. However, to keep MSG reception working
normally after removing the [*] entry, you would need to add entries to
allow data channels 1, 2, 3 and 4 to be received, like this:
[EUMETSAT Data Channel 1]
target_directory=received
[EUMETSAT Data Channel 2]
target_directory=received
[EUMETSAT Data Channel 3]
target_directory=received
[EUMETSAT Data Channel 4]
target_directory=received
You need to add one entry for each data channel you take, so that might
include extra channels for DWDSAT data or SAF data. Check carefully
that you are getting all the data you expect after removing the [*]
entry. There is a list of all the data channels here.
- Be sure to specify a temporary path to the TelliCast
system. This allows the software to build up the file in a different
directory to the main receiving one, and then simply "move" the file to the
"received" directory once it is
complete. On the same disk, "moving" a file is simply a
relatively quick rename operation. I have seen files taking 30 seconds to build up, so there is
a chance you will get incomplete data should your reception software try and
use the data before it is ready. Use the single entry in recv.ini if all your
data is saved on the same hard disk, otherwise you need a per-channel entry
for the temporary directory in recv-channels.ini.
You should also ensure that the logging level is set to quiet (unless you
are debugging) to reduce disk activity, and also have TelliCast buffer the
log data before writing (use the =>> specifier in the "log_file="
value).
_________________ recv.ini _________________
[parameters]
......
tmp_directory=temp
......
[logging]
log_file_size=1000000
log_file_number=2
log_level=quiet
......
[locations]
......
# log_file=recv.log <- remove or comment out this line,
and replace with line below
log_file=>>recv.log
......
You may need to add this entry to recv.ini as it may not be there by
default. There may be other lines (shown here as ......) which you
should not touch. Please note that any line in these files which
starts with the hash character "#", is a comment line, so it is
possible to make a line "inactive" by placing a # in front of it,
such as in the example above where I have "commented out" one
"log_file" line by adding a hash at the start. This allows
me to see what the line was before it was changed.
- If you are running a RAMdisk, ensure it is at least 80MB in
size. How do I use a RAMdisk? See Arne
van Belle's article here. Also remember to edit the entry in recv.ini to tell the
TelliCast software to use the new size of the RAMdisk. 80MB is
actually 83886080 bytes, but I like to allow a little margin and specify
just 83500000 bytes for the file size. Be sure to check the number of zeros
carefully!
_________________ recv.ini _________________
[locations]
......
file_database_directory=Z:\receiving
[parameters]
......
file_database_size=83500000
......
There may be other lines (shown here as ......) which
you should not touch. The example supposes that your RAMdisk is on
drive Z: 80MB actually doesn't allow a lot of margin in the case of
signal errors are recovery attempts. Already, Arne van Belle has seen
his FSY file increase to over 92MB, so for the most robust system a
RAMdisk and file_database_size of perhaps 150MB would be safe. Or
you can just miss some segments! If you run your system for less
than 24 hours per day, you may be able to get away with a smaller size (I
would suggest at least 70MB), but if you run 24 x 7 I would suggest a
larger size. Of course, if you are limited in memory you may need to
compromise (perhaps your older motherboard doesn't allow more than 512MB). If
you have plenty of memory, be careful not to set the RAMdisk size too big.
Setting it to 300MB may hang the system, and require that you reboot in
Safe Mode to reset the value to a lower figure.
- There may be limits on the size of a RAMdisk using the free
AR Soft RAMdisk product (which the MSG-1 group is allowed to
provide to its members, you will need to join the group to download this
software). I have seen an 80MB RAMdisk allowed in a 512MB
Windows 2000 system, and a 300MB RAMdisk in a 2GB Windows XP system [but on
later checking, the allocated size shows on a 254MB disk, so do check with
CHKDSK Z:). Arne van
Belle reports a 1GB system allowing a 132MB RAMdisk. He comments: Symptoms: When you set a higher size ARsoft will start but RAMdisk turns
out to be smaller than configured. Only if you set the size very large, there will be no RAMdisk loaded at all.
You can see this as an error in the Event Viewer." Members of
the MSG-1 self-help group may be able to download the AR Soft RAMdisk from the Files area: MSG-1 group/
=> AR-Soft-RAMdisk.zip. (One person has reported that
Netscape cannot download the file correctly).
- There is an alternative free RAMdisk available - details
here.
- EUMETSAT have recently introduced some new products, which
may require you to make some changes.
"Land SAF South America products were enabled last week as
essential data. Users have to enable PID 509
in order to receive the data, otherwise the TelliCast software will turn red
 on every related transmission.
"If you want to turn off reception of this stream and not have
the red alarms, please disable the channel in recv-channels.ini and keep the
PID selected."
See also the EUMETCast
trouble-shooting guide
- Why does Metop data appear to halt near the North Pole and
resume some minutes later? No, it's not waiting for Santa Claus, but
it's that the data from one pass can be sent over EUMETCast in slightly less
than the orbital period, so there will be a data gap between the end of one
pass and the start of the next. The images you see are one orbit
delayed.
- More to come ... please tell me what you have found
so that others can share your knowledge and experiences!
Mini checklist
- Are you getting 28.123MB files into your received directory
(\EPS-10\ below your TelliCast received directory in the example above). If so, you are getting the EPS-AVHRR
data correctly.
- Note that a new file should appear at least once every
three minutes, except for a 15 - 20 minute period at the end of each orbit.
If you are not getting that data:
- have you asked EUMETSAT for the data?
- have you added PID 510 in your SkyStar configuration?
- have you set the file_database_size in the TelliCast software?
- if you are using a RAMdisk, is it at least as big as the file_database_size?
As posted on the MSG-1
support group...
- Arrange with EUMETSAT to receive the data (visit the portal)
- I assume you already have reception of MSG-2 and are getting the HRIT/FSD data using a receiver setup with an aerial pointed at the satellite at 9 degrees East (Eurobird 9) on the channel 'Media Broadcast'.
Verify that this is correct.
- If not already set, add the PID 510 (decimal) in the Data Services.
- Edit the recv-channels.ini file to receive the Metop data stream by adding as follows:
--------------------------------------------------
#METOP AVHRR data channel
[EPS-10]
target_directory=C:\received\EPS-10
#use the path and directory name you have chosen for this
data
--------------------------------------------------
Of course, the path you specify may be different on your own system - choose
a path under your existing "received" directory.
- Install the Metop Manager. When it is installed, set it up: Under Setup, select the tabs File Controls; Global EPS
Metop Data; AVHRR, and fill in the boxes for 'TelliCast Metop AVHRR global received files path' using the 'Browse' button to find and click on the
EPS-10 directory you created in step 4; and 'Combined files path' which you will need if you want to use HRPT Reader to look at combined files.
Also fill in the box 'Processed EPS Global Files path', which can be anywhere but is usually put in a separate directory called 'EPS-Global' in the Images tree where the MSG
image data is stored.
- As soon as you edit recv-channels.ini and save it, the TelliCast
software will start to put data in the received folder specified in 4 above as the target_directory.
You can look at this folder with the Windows Explorer and can see the files accumulating.
They will not start to disappear until step 5 above is completed and the Metop Manager is running, when it will access the data accumulating in the received folder and process it, deleting it from the received folder as it does so.
Good luck!
|


